

|

|
Recent Advances in the Ultrasonic Inspection Recording and Reporting – Instrumentation
Vlad Moshkovich, Alex Passi, Garri Passi
Part 1: Simplified Rapid Imaging of the Separate Sections of the Test Objects – Classification of the B-Scans
 Since the beginning of ultrasonic inspection era the numerous attempts were made to bring the testing results output to the easy understandable and interpretable level. The inspector's conclusion "GO / NO GO", manual marks of the defects location and coordinates on the inspection was the typical ultrasonic inspection output in the near past. Recently such output was significantly improved since the digital ultrasonic instruments capable to store the A-Scan shots along with corresponding calibration damps and to convert them either into the hard copy or computer file appeared. However it is still not enough for the "non-ultrasonic" people who actually are the end clients for the inspection results – the A-Scans are still not saying them nothing
As an alternative to the typical A-Scan ultrasonic inspection the automatic and semiautomatic units were created by many organizations. Depending on the inspection technology the testing machines are capable to record the ultrasonic data providing the B-, C-, D-, P- scans and TOFD images represented in real time with the hardcopy and file outputs, which are already welcomed by the end clients. Some successful models of the said testing machines found their niche in the field but the manual scanning using portable ultrasonic instrument still remains the sole economical and practical solution for the huge number of routine inspections
In order to close a gap between market demand in getting the ultrasonic testing results imaged and the practically and economically reasonable way of doing inspection the manufacturers of ultrasonic equipment started to promote the new portable instruments equipped with simplified rapid imaging features and options allowing to present separate sections of the object under test as real time B-scan displays as well as to generate the hardcopy and to store the B-Scan images. The B-Scan feature existing in the technical data sheet of an instrument often becomes a lead to the purchase decision because in many cases (hard access to the test object, limited space for the probe manipulations, etc) the simplified B-Scan imaging of the separate sections of the test object is the only solution to get some highly demanded graphical record in the inspection report
On the other hand just a note on the B-Scan in the list of features may lead to the wrong instrument selection because the existing advertising and technical literature in many cases does not explain exactly what are the B-Scans modes available among the plurality
The present article is an attempt to distinguish between the different modes of the rapid B-Scan imaging implemented by the portable ultrasonic units
Generally the B-Scan is defined as two-dimensional graphical presentation, in rectangular coordinates, in which the
The encoded (true-to-location) B-Scan may be obtained through the processing of the signals received while scanning over the section to be displayed with probe fitted into one-axis coordinate encoder interfaced to the instrument
The timed (time-based) B-Scan may be obtained through the processing of the signals received along the scanning over the section to be displayed with some probe driven with the approximately constant speed during the certain measurement period in one direction
The B-Scan(Th) may be obtained with the straight beam probe either single element or dual through the recording of the successive thickness readouts along the scanning path or in time progress. Fig.1 is the typical example for the instrument screen while capturing the B-Scan(Th) (all screenshots and movies in this article were obtained using ISONIC 2001 unit, manufacturer – Sonotron NDT [2]). The dynamic example (movie) on getting B-Scan(Th) for the stepped block is available here 
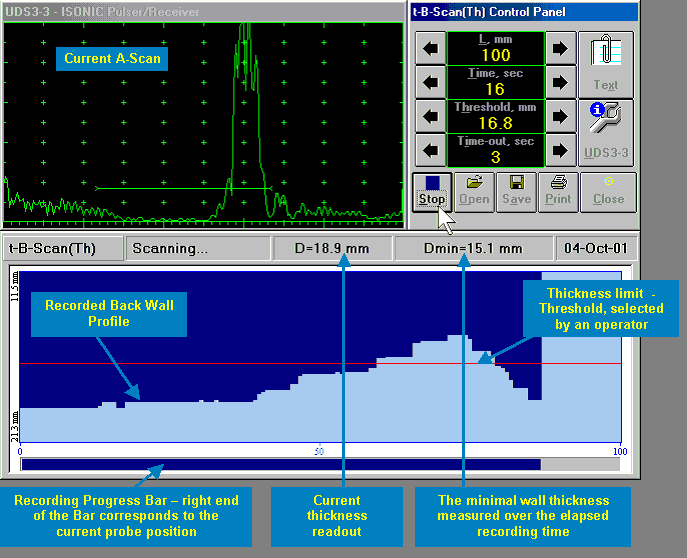
Fig.1 Typical instrument screenshot for the capturing of the B-Scan(Th)
The B-Scan(Th) presentation is the only possible mode of getting the cross-sectional image for the most of known instruments however, to our regret, it is still noted as B-Scan in the advertising and technical literature without the additional comments. However it's obvious that such form of presentation is not applicable to the straight beam and angle beam pulse echo inspection based on the processing and recording of all signals and their amplitudes
The 
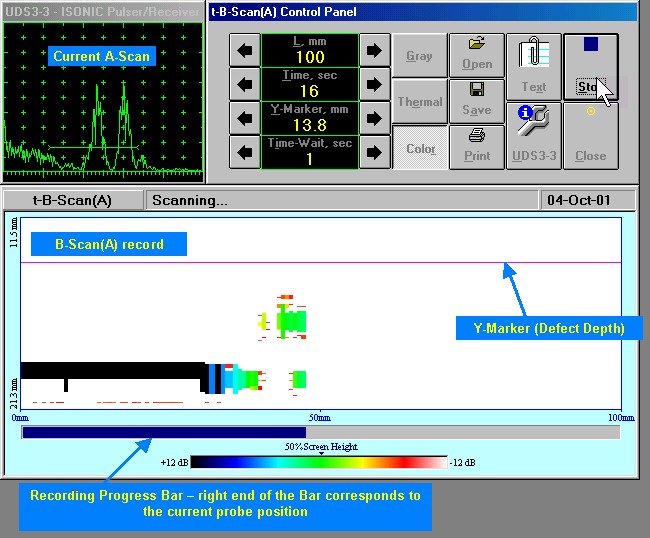
Fig.2 Typical instrument screenshot for the capturing of the
The
The RF B-Scan may be obtained through the capturing and recording of the successive RF A-Scans along the scanning path or in time progress. This way of presentation is mostly used for the TOFD technique [3]. It is important that the instrument stores not the image but the array of successive unprocessed RF A-Scans and the RF B-Scan is reconstructed from the said array. Fig.3 is the typical example for the instrument screen while capturing the RF B-Scan. The dynamic examples (movies) on getting RF B-Scan – TOFD Map for the test block with the diffractor are available here  (scanning along the diffractor) and here
  (scanning across the difractor)
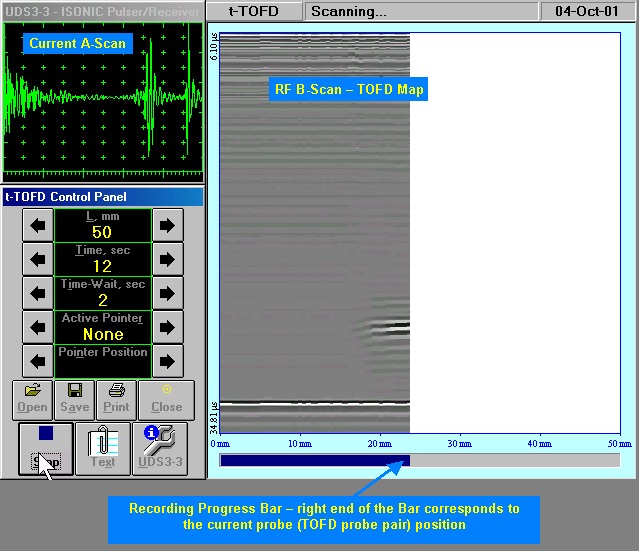
Fig.3 Typical instrument screenshot for the capturing of the
Thanks to the raw data storing mechanism each A-Scan obtained along the scanning path may be recovered at the postprocessing stage (off-line). This feature is a must for the TOFD defects sizing and localizing of the defects tips
The most advanced
Fig.4 is the typical example for the instrument screen while capturing the 
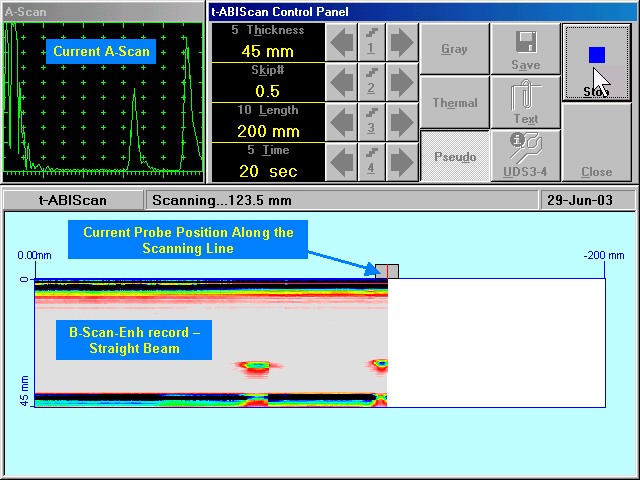
Fig.4 Typical instrument screenshot for the capturing of the
Fig.5 is the typical example for the instrument screen while capturing the 
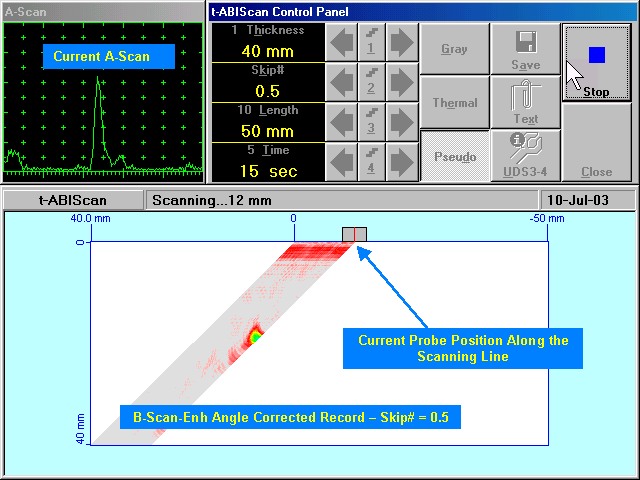
Fig.5 Typical instrument screenshot for the capturing of the
Fig.6 is the typical example for the instrument screen while capturing the 
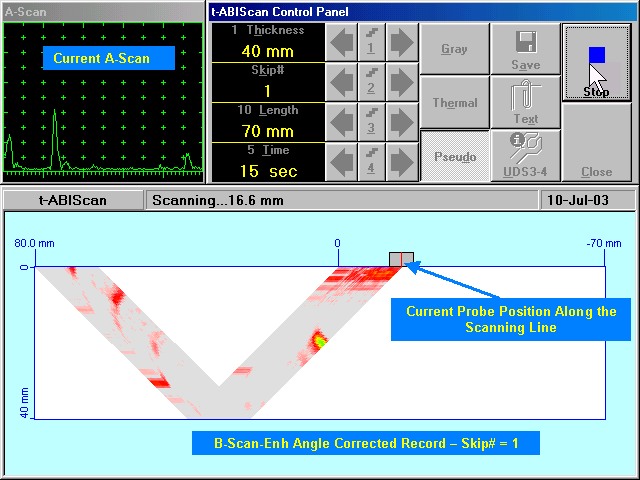
Fig.6 Typical instrument screenshot for the capturing of the
Main advantage of the
The Fig.7 illustrates the above:
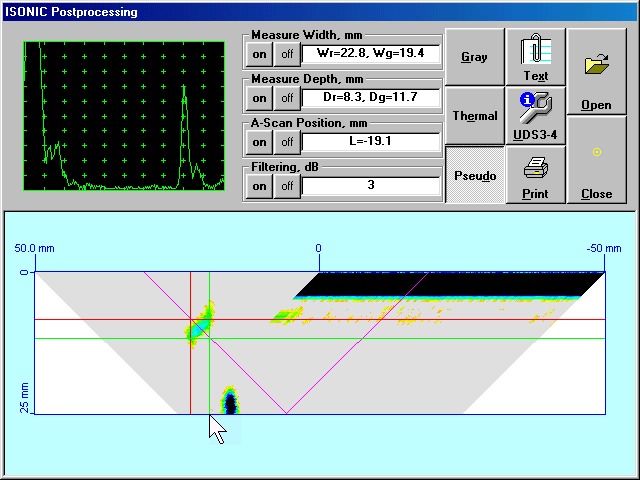
Fig.7 Off-line analysis of the